Sunday, May 6, 2012

The Threat of Frost has Passed

Bales prepared for sowing seeds directly.  First three topped
with potting soil from the nursery; the fourth with compost
from Straw Bale Garden 2011.  The furthest bale has cherry
tomatoes sprouted from seed indoors.
      Hola!  It has been a while since the last post, and I apologize to anyone that reads the blog. There wasn't much to update as the garden was on autopilot mostly for much of April.  A lot has been done in the past couple weeks though. Here is a breakdown of recent going-on...

     This is the time for planting, both seeds and seedlings.  I actually put the seedlings that I started indoors into the bales 2+ weeks ago, tempting fate with the possibility of frost.  It seemed like a worthwhile gamble since we were taking a family vacation to Puerto Rico for the last week of April and the plants wouldn't survive inside.  No surprise: it actually snowed(!) in PA while we were gone.  York didn't get snow, but did get a frost that killed the cucumber seedlings.
Frost almost got the cherry tomatoes, but they pulled
through, have new growth, and should recover nicely.
     The cherry tomato and bell pepper seedlings got hit by the frost as well, but didn't die.  Of course then something came and ate the pepper plants, but at least the tomato plants made it! They took a hit, but are going to make it I think, based on the new growth since then.
     I decided to grow the cucumbers again from seed, but right in the bales this time.  I placed them in the same bales that the frost got the first ones, the last (5th) bales in rows 2 and 3.  This placement should allow them to spill over the ends of the rows should the vines need more space.  Space Master is in row 3 (R3,B5) with Orient Express in row 2 (R2,B5).


Lucas and Vivienne help out.
     Also using seed I planted the wax beans (R3,B3), the green beans (R3,B4), the edamame (R3,B2), the broccoli raab (R2,B3), and another bale of sugar snap peas (R4,B1).  For all but the broccoli raab I just used my finger to make holes, spacing the seeds about 3" apart for the edamame and about 2" apart for the peas and beans.  The broccoli raab I planted in two rows, scattering seeds along two shallow trenches. Hopefully we will see seedlings poking through soon.
Pepper plants: 6 varieties in one bale.


     The peppers I replaced with an assortment of six different seedlings I bought from the nursery.
They include 4 bell varieties: 1 purple, 1 yellow,
The sugar snap peas are almost ready to begin training on
to the fence.
and two red - one of which is supposed to change gradually from and ivory color to pink and then to red.  The other two are a thai hot pepper and a poblano pepper.  I may decide plant one more bale with peppers.


Meanwhile the cold-hearty plants are doing well for the most part.  The sugar snap peas especially have taken off nicely, giving me confidence that planting seeds directly onto the bales can be effective.  These plants definitely look better than the three spindly snap pea plants from last year (purchased from the nursery) and I will be growing my peas from seed every year from now on I think.
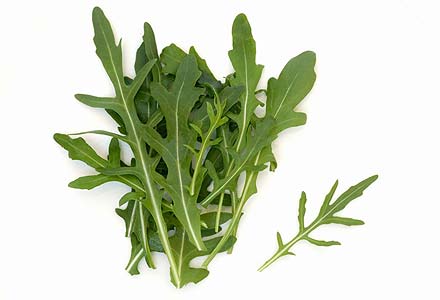
Yummy Arugula


     The arugula is growing in well and it is heaven to have an entire bale of it.  I munch a leaf or two every time I check the garden. Adding it to the mesclun blend of greens makes for great salad.


Mesclun Blend

Broccoli plants

The broccoli has already begun flowering


     To fill out the rest of the garden I went with seedlings started at the nursery.  Planting these is as easy as digging a hole and plopping them into the bales.  I found a six-pack of good looking broccoli...
Brandywine


     I used the composted bales from the 2011 garden to make a bed for the full-sized tomato plants.  I lined the bed with bricks to keep the soil from eroding and mulched around the plants with the dried pumpkin vines from last year.  Among the 5 tomato plants I picked up are 2 Brandywine heirlooms...
 ...2 Champion II...
...and one Early Girl that already had 2 tomatoes growing on it!
Yellow Summer Squash


     I then mounded more of the 2011 compost and planted the vine crops down in the corner, where they did well last year.  First came the yellow summer squash...
Spaghetti Squash


... followed by the spaghetti squash at the corner...
Sugar Cube melons


...and last I placed the Sugar Cube melons along the back of the fence where I can train it up and over the fence to help keep the fruit hanging and off of the ground.

There are still 4 bales left to plant and I am not sure what will go in them.  Right now I am leaning towards one more bale of peppers, 1 each of wax beans and green beans, and possibly planting the patty pan seeds from Burpee on the last bale of the 4th row where it could grow over the edge and ramble.  I will be stopping by Valley View nursery in Hunt Valley this week though, so this could change.  Until next time, happy gardening everyone!

Sunday, April 8, 2012

Sowing Seeds and Early Growth

Lucas helps prepare the bales for sowing

        Hello everyone and Happy Easter!  It has been a while since my last post, but that doesn't mean we haven't been busy with the garden.  In fact the warm spring has been perfect for getting a jump on the spring planting.  After weeks of watering the bales have had their temperature spike, some reaching as high as 120 degrees F(!), and then have cooled.  It is important to wait for the bales to complete this process before planting as the high temperatures can damage the seedlings' roots.  The seeds from the wheat straw have begun sprouting as well.  If you are following along: don't try to pull the wheat grass until you are ready to use the bales.  It can be frustrating and it grows back quickly anyways. Besides, the longer and stronger the wheat grass gets, the easier it is to pull out!
Bales topped with ~2" soil/composted manure
        So now is the time to start the cold-loving crops outdoors and the less frost-friendly plants indoors - if you have seeds that is.  If you plan on using seedlings from the nursery you have another month or so of waiting at our latitude at least.  
Sowing arugula seeds

Lucas and Vivienne watch as seed pots are prepared
Sowing Outdoors     
        For the frost-resistant crops - various greens and snap peas in our case - sowing the seeds directly onto the bales is the prescribed method.  For this you will need to add a layer about 2" thick of soil to the top of the bales so the seeds have something to take root in.  Lucas and I chose to put about 1" of potting soil down first (after pulling as much wheat grass as possible), then followed with around another 1" of humus/composted manure.  After spreading this out evenly we were ready to sow our seeds.
        For the snap peas we made two shallow trenches on either side of where the soaker-hose runs down the middle of the bale closest to the fence.  This will assure the plants plenty of water and something to grow on.  We followed the instructions on the packet and planted the seeds about 2" apart and covered them with ~ 1 cm of soil.  If all goes well we will see seedlings start to sprout in 7-14 days and will use this as a cue to sow another bale with the peas.  This will allow for a more continuous harvest for the rest of the spring.
 
Cucumber seeds into the prepared pots


Micro Greens peak above the soil


        For the greens we simply sprinkled the seeds atop the bales, being sure to broadcast them as evenly as possible.  A thin layer of potting soil was then spread over them.  After all seed were sown the soaker-hose was replaced carefully and the bales were thoroughly watered with a gentle setting on the spray-nozzle so as not to wash away our handy-work.  Then the hose was reattached to the soaker-hose, the timer was set, and the garden was back on auto-pilot.  Every few days for the first week I used the spray-nozzle again to get an even soaking, then we started to get regular rain that kept the garden nice and moist.
        It is important to not be fooled by warm spells early in the spring and realize that frost WILL come. Only plant your frost-resistant crops outside until the threat of a frost has reasonably passed.  This doesn't mean that you have to wait to get your warm-loving plants started though!
Cucumber and tomato plants growing
                                                   
Sowing Indoors
        Not all plants can take the cold of spring.  Crops like tomatoes, cucumbers, squash, peppers, and beans - these like it warm.  Pay attention to what your plants can handle.
        Since I like to select at least some of my plants from seed catalogs I have taken to starting the warm-loving plants indoors (except for the beans - they don't transplant well as I learned last year the hard way).  Starting seeds is easy using a seed-starting kit from your local nursery.  This year's kit included pellets that expand into growth medium when soaked with warm water (use the amount of water dictated in the directions for best results).  Once the pellets have expanded to fill their pots, use a crayon to achieve the perfect sized holes to sow your seeds in.  I have always planted two seeds to a hole, though it probably isn't necessary.
        After putting the seeds in I covered the holes over loosely, put the cover on, and within a couple of days we had cucumbers sprouting!  Make sure to note what is planted where to avoid confusion, I didn't do that last year and had no idea what was what in some cases.

Growth Begins
        After about a week we began to see the greens coming up outside. The soaker-hose seems to be keeping the bales moist enough to promote growth all the way to the edges.  After 12 days the peas began to arise, I'll have to get a picture of those and get going on starting another bale of them.  A perfect project for a beautiful Easter Sunday!
        The greens I will start to thin when they get just big enough for salad.  Hopefully they will keep salads going all spring like last year.
        The indoor plants are doing well at their south-facing window.  The squash and peppers have yet to show themselves and I am doing my best not to panic as the peppers at least took their time last year as well.  I am glad to see the tomatoes and cucumbers coming up - they are  special varieties.  If the peppers and squash don't make it I can replace them with seedlings from the nursery.

        If you haven't started your straw-bale garden yet, it is not too late!  Get out soon and find some bales.  Get them wet, add some high-nitrogen fertilizer, and they can be ready to plant before Mother's Day.  It requires a little work, but trust me, the benefits are worth the effort!

Sunday, March 11, 2012

Straw Bale Garden 2012 - Prepping the Bales

Thor the Dog looks on as the soaker-hose is placed
It is time to start building this year's garden.

On Saturday I went out to a farm north of York with my neighbor's F-150 to purchase 20 straw bales.  I found the bales advertised on Craigslist for $3.50 each, a bit more than the $2.50 apiece I paid last year.  They were worth the extra price though, because this year's bales are at least 6-8" longer than last year's, affording more space for planting.  For those of you following along, 20 bales placed on their ends happen to fill the bed of an early-90's F-150 perfectly, so that no straps were even needed to hold them in for the ride home.

After placing the bales initially in the exact configuration I had previously planned, I decided to change to 4 beds with 5 bales each to better accommodate the layout of the soaker-hose.  The bales were placed with care to keep them lined up evenly and pushed together as snugly as possible.  I used whatever bagged soil I had left over from last year to spread on top of the bales, followed by a layer of coffee grounds from a big bag I got from Starbucks.  Then it was off to the stores to get supplies.

Vivienne plays with Stu the Cat while Thor and Zoe keep watch
I purchased 6 bags (0.75 ft^3) of potting soil and 2 bags of Humus/Composted Manure (bigger, not sure how big exactly) and spread 1 bag of potting soil evenly on each bed followed by 1 bag of the Humus/Composted Manure spread over all beds.  This seemed to achieve the desired ~1" thick layer atop each bale that will gradually wash into the straw, allowing for better water retention.  The black on top of the bales will also warm the bales more from the sun, theoretically hastening the composting process.  Once the topping of the bales was complete, it was time to place the soaker-hose.  The remaining bags of soil and Humus/Composted Manure will be used later to top bales for direct sowing of seeds.

Lucas helping out with the placement of the soaker-hose
After trying several layouts, I settled on a pattern of weaving the hose back and forth along the length of each bale, taking care to keep the hose centered on each bale for optimal soaking.  I purchased 2 additional 50' soaker-hoses to go with the 1 50' hose from last year's garden.  The hoses are wound up when you buy them, so I recommend using bricks or something similar to hold the hose in the desired pattern and leaving overnight to "train" the hose into the shape you want.  Once the hose will retain its desired shape, use tent stakes, landscaping staples, or something similar to hold the hose down on the bales.

Staking down the hose with landscaping staples
Some bales have their hose doubled-up for x-tra water
It is important to plan carefully how you want the soaker-hose placed before planting, as it is difficult to move the hoses after the plants are in place and doing so creates a high risk for damaging your seedlings.  For my layout I made sure that the bales closest to the fence had more watering potential by doubling up the hose across these bales (see left).  I know from my plans that these bales will have plants that need extra water, like tomatoes, and so I planned ahead.  This will go a long way towards making my garden automated, and requiring much less of my daily attention.


Our rabbit-defense system tries out a new perch
Hose-timer: A potential big money saver
I splurged this year on a hose-timer to automate the watering of the garden.  Last year I tried to remember to turn on the water when I got home from work each day, and far to often I would forget to turn it off again.  The water bill got out of hand, to the tune of over $100 a month, and most of the water was wasted running out the bottom of the bales and taking nutrients with it.  This model of timer cost $28 at Home Depot and seems to work well.  For bale-prep I currently have it set to run for 15 minutes 4 times per day.  I may have to take it off if it gets to cold out at night; freezing will damage it.  Be sure to read the directions.

The soaker-hose getting revved-up
Final lay-out of Straw Bale Garden 2012
Once I had the hoses set up I tested out the watering system before the final stake-down.  I noticed that one of the hoses didn't leech water well from the first 1/3 of its length, so I changed the order of the hoses so that that stretch of hose wouldn't be in an area needing watering (between the last bed of bales and the area from the 2011 garden).  Again, this type of preparedness will help avoid headaches later on when the plants are in place.  So now the garden is ready to go, the bales just need to cook and I will be adding high-nitrogen fertilizer after about 2-3 weeks of soaking to speed the effect of the composting process.


Wonderful soil resulting from the composting of 2011 bales
The plan going forward is to start my seedlings at about the beginning of April, so that the seedlings will be ready for planting in early May.  Spring greens will be planted directly into bales about the middle of April and other crops like string beans will be planted directly into bales at about the beginning of May.  Large seedlings of some tomato varieties will be purchased from a nursery in May as well, and planted into the enriched soil left over from the 2011 garden (see right).  Hopefully everything will go smoothly and this year's garden will be the best yet.  Now go get your hands dirty, it is time to get busy!

Friday, February 17, 2012

Changes Regarding Comments

I am new to this blogging business, so I didn't realize that the default setting was that you had to register with my blog to leave a comment.  I have now changed this so that anyone, even anonymous may leave comments.  Hopefully this will encourage more constructive criticism and enable me to answer any questions more directly.

Thanks for reading. 

Thursday, February 16, 2012

What Will Fit in a Straw Bale?

I learned the hard way last year that there is only so much that can reasonably be grown in each bale of a straw bale garden.  The problem I ran into is that there seems to be much space available when planting, leading to an urge to plant more than the bales can reasonable sustain.  There are many resources on the interwebs that warn against this and offer reasonable numbers of plants per bale depending on what is being planted, most of which I would consider a bit conservative despite my over-planting issues of a year ago.  I just went way, way overboard.

So here is a list of what I plan to plant in my bales for Straw Bale Garden 2012, dependent on what crop is being planted.  Of course I don't claim to be any sort of expert on the subject, what with only a year of experience under my belt, so take these numbers with a grain of salt.  Of course numbers may vary quite a bit for some crops, so be sure to take into account the description of what size your plants will end up being.  No matter what, try not to plant bigger plants like tomatoes too close to the edge of the bale or it will become unstable when it grows large.


  1. Tomatoes - The conservative number here is two plants per bale, but I think most varieties can probably fit three plants as long as the tomato bales themselves are spaced apart from each other.  In this case I would zig-zag the plants in a V-shape across the bale to space the plants as far apart as possible.  
  2. Cukes/Squash/Things that grow on vines - This type of plant really is more dependent on what space you have available for the vines to ramble, but assuming this is not too much of a constraint each bale should be able to accommodate upwards of four plants.  Three might be better though if the plants are going to be wide ranging, as bigger plants will consume your bale more quickly and hurt the harvest yield.  Cukes and summer squash in particular can be trained to climb a bit so keep that in mind to save ground space.  Winter squash have huge leaves and seem to crowd-out other vines competing for the same space.  I ordered one variety of cuke this year called "Spacemaster" that I am hoping will mostly stay atop its bale.  I think anything advertised to be good for planters on your porch/deck are just right for straw bales.
  3. Peas/Beans/Etc. - These can be planted very close together and I think 12-15 plants per bale are easily accommodated for most varieties.  I had 15 wax bean plants in one bale last year and they did very well.
  4. Spinach/Loose Leaf Lettuce/Other Greens - I plant these in pretty thick by scattering the seeds on a prepared bale, then thin them out as they grow in.  This worked very well last year, with the thinned leaves and shoots creating the base for really wonderful salads.
  5. Peppers/Eggplants - Unless they are really large plants, six in each bale should be fine.
Things I am not experienced with directly, but can make a good guess at:
  • Broccoli/Cabbage/Head Lettuce - Probably six plants would work well, possibly eight.
  • Corn/Sunflowers - I wouldn't try these at all, personally.  2-3 plants for each might be feasible if the ground your bales sit on is very flat.
  • Root vegetables - These are not supposed to do well in bales.  I think the nature of the substrate would not allow for normal growth of things like carrots, potatoes, etc.
There are probably some types of plants I am forgetting to include, but this list should be a good starting point.  I think the best answer though, is just to realize how big your plants will be when they are fully grown, and don't be tempted by the tiny size of your seedlings to add more and more.

Happy gardening.

Saturday, February 11, 2012

2012 Lineup - The Greens

So I ordered all of my seeds by mail from the 2012 Burpee catalog, and would love to use their images but they seem to have them blocked.  Instead I will attempt to add pictures of the varieties I chose from Burpee using Google to find them.  Where this is not possible a description will have to suffice. All pictures used will have a written credit with a link to their source, and if this is to a rival seed company, well, perhaps Burpee could have thought this out better.


By far my favorite bale from Straw Bale Garden 2011 was the one planted with a Mesclun blend of greens. This packet consisted of a mix of 5 different varieties of greens suitable for salad or saute.  I planted the entire packet on one prepared bale and pulled the greens for salad to thin them out as they grew.  In retrospect I would have rather had the greens separate for easier harvesting and I could have spread the seeds a little more thinly to allow for a duplicate application after the first plants went to seed; both of these observations will be incorporated in to the execution of Straw Bale Garden 2012.

The following are the greens I ordered from Burpee this year, along with a short description and notes on how they will be arranged in the garden.  Hopefully we will have a plentiful harvest as a base for many great salads in 2012.

Arugula
Rocket Arugula

Picture Credit: ZW Horticultural Co, Ltd

This was the star of last year's garden as part of a Musclun blend I planted in one bale.  The peppery flavor is amazing and makes any salad "pop" though it loses a lot of flavor when cooked.  I used it to make a pesto with pasta as well.  I am hoping that by planting both bales 1&2 with just arugula that I will have an overabundance in the kitchen.

Salad Fresh Cutting Mix


I'm not going to try to find pictures of all of the components that make up this Mesclun blend of greens.  It sounds like it will be pretty close to the same thing I planted last year with the addition of the endive.  The description from Burpee is as follows:

For this feast of summer greens, we chose our absolute favorite varieties.  Mix them up for delicious, fresh adventures in salad.  Includes piquant arugula, tangy and nutty endive and radicchio, crisp and sweet red and bright green lettuces, and sharp and spicy mustard.

The mix will no doubt include the same Rocket arugula as described above and I hope to use these leaves to round-out garden salads.  Being stingy with this seed packet might give me something to plant later when space becomes available as well.  This will be in bales 3&4 to start with at least.

Tendergreen Mustard
Tendergreen Mustard
Picture Credit: backdoorgardener.com

This is the exact image from the Burpee catalog.  Their description is as follows:

HEIRLOOM.  One of the mildest mustards, the leaves are smooth and make a fine spinach substitute, especially in the fall.  Seeds germinate and grow quickly in late summer heat, and mature to tender sweetness in cool weather.

I plan to use this late in the season to replant the bales that had other greens earlier in the year.  We love spinach around here, using it in salads and the Dutch favorite "aardappels an spinace" where it is boiled and mashed with potatoes.  Not having a suitable late-season fill in crop last year was a major shortcoming that I plan to rectify in 2012 and this will fill in gaps in the garden come late summer.

Burpee's Microgreens
Random shot of Microgreens

Picture Credit: About.com Gardening 
This is something that I find very intriguing.  I'll turn to About.com for a great description:

Remember when sprouts were all the rage?  Well here's something just as nutritious and you don't have to change the water every day.  Microgreens.
I'd been noticing microgreens getting a lot of attention recently.  Microgreens are the tiny shoots of various greens, herbs,edible flowers and leafy vegetables.  The Cook's Microgreens Mix pictured here contains beets, broccoli, kohlrabi, Chinese cabbage and radish.  You sow them every 5 - 10 days and snip them off when they reach an inch or two high.


I can't wait to find out what kind of flavors this will add to a salad, not to mention the micro-nutrient boost promised by such a mix of fine edibles.  This will probably only last through May in bales 9&10, so other crops have been planned for later in the season.

"Spring" Raab
"Spring" Raab

Picture Credit: Gaea's Gate Produce
This is a crop that maybe stretches the definition of a "green" but since it doesn't fit nicely under any other catagory, here it is.  I was first exposed to this broccoli-like produce as a member of a CSA where it was grown.  It has a wonderful broccoli flavor, with little flowering heads in bunches of leaves.  The whole top part of the plant is edible, leaves and all, and I prefer it wilted in olive oil and balsamic vinegar with toasted almonds.  Yum!

Sauteed Raab

Picture Credit: finecooking.com
In future posts I will describe what other crops I have planned for the garden.  Now I must go prepare dinner because this post made me hungry!

Friday, February 10, 2012

Straw Bale Garden 2011 - Mid-Season Growth

Straw Bale Garden 2011 didn't turn out as well as it could have, but it still exceeded my expectations by a lot.  Without making this post too wordy, here are some shots of the garden as it looked in early July.  This was in many ways the peak of the garden.  The first planting of spring greens had run its course and had been pulled out after going to seed.  Many peppers, tomatoes, and eggplant were almost ready to pick. Wax beans were proliferating and were a centerpiece of 2-3 meals a week.  The squash vines were threatening to take over.  

After this point the garden started to overgrow in many ways, but at this moment of the summer the garden was truly everything I had hoped it could be.

Peppers
The long green peppers really weren't what was advertised as they were supposed to be long, red Thai chilies.  They were still very tasty and beautiful on the plant.  The little peppers in the foreground would turn bright red and were wonderfully hot.  Just a couple of those would heat up a stir-fry righteously. Peeking in at the back you can make out a wax bean nearing ripeness.

Tomatoes
Before they began to choke each other out, many of the first tomatoes turned out very well.  The Black Cherry tomatoes were dominant eventually.  Luckily they were delicious.

Green Deer Tongue Lettuce 
This lettuce variety was very good at first but became bitter rather quickly.  Going forward I am skipping lettuce in favor of other greens like arugula, mustard, and spinach.

Kellogg's Breakfast Beefsteak 
This was the tomato that I waited forever to ripen, and then by the time it did the bugs had gotten to it a bit.  This variety is an orange heirloom and has nothing to do with the cereal company.

View from the property line.  Thor the dog looking on.
To the left you see Musque de Provence pumpkin squash.  To the right is Honey Boat squash.  The smaller leafed vine in the middle is Mighty Mite cantaloupe melon.

Zoe the dog rests in the shade under the tomato jungle
This shot illustrates how overgrown the tomatoes had already gotten before they were even ripe.  Having the dogs inside the fence, plus Stu the cat roaming around, really helped keep the rabbits away.

Musque de Provence squash
We eventually harvested 6 of these, most of them huge (like 2' across).  The flesh is wonderful and I still have a freezer full of processed pumpkin in ziplock bags.

Honey Boat squash
These were a real treat, though we only managed to harvest around a half-dozen of them.  They had a sweeter flesh than a Butternut or Acorn variety.  Many squash either never made it to ripening or went unnoticed and rotten on the vine unfortunately.

Japanese Eggplant
I had a co-worker who took these off my hands after I decided that I just don't like eggplant.  At least most didn't go to waste, though some were eaten by some sort of insect.

Hopefully I will be able to make the 2012 edition more efficient after all I learned last year.  It would be nice to can some tomatoes at least.